Tuesday, 4 June 2013

Kinder Kandinsky

If you've ever asked someone to borrow oil pastels from their room, you'll understand what I mean when I say I had to steal oil pastels today. Okay, not really steal. But I borrowed without asking ... and that's because it's really hard to get your hands on oil pastels. ESPECIALLY if you tell the person that you're borrowing from that you're going to let kindergarten use them!

Don't worry. They were returned, safe and sound. We didn't even break any! The oil pastels are an absolute treat for any artist ... even at a very young age, these kids can understand why these tools were such a special addition to the art centre today.

"They're special crayons because they're dark!"

"They're rubbery and soft."

"They look like paint!"

I sat down at a table with some supplies and called over a few students at a time to show them the art project of the day - Kandinsky circles! We went over the materials that we would be using, any special things that we needed to take into consideration (like personal space and rolling up our sleeves), and went over the directions. I showed them how to trace circles (using a tracer) and reminded them to write their names. Some students fit 4 circles on their page, some fit 5. We then had a discussion about their favourite colours ...

"I like yellow, just because."

"I like purple and blue."

"My favourite is orange because I like oranges!"

Here's a sneak peak of their creations ...


I'd love to share their final products, but ... they're not quite done yet!

Here's what they're SUPPOSED to look like. But ... keep in mind, I didn't show them what it SHOULD look like. And, if they're SUPPOSED to look like this, then that would imply that there is a right way and a wrong way ... I just told them to make circles, choose colours they like and go around and around!


If I showed them this, I think some of my little guys would get upset that their final product didn't match what it should look like. I'd rather not let these budding artists feel like anything less than budding artists at this point.

TTFN, Pin It

Friday, 31 May 2013

Flubber. Gak. Goop.

We didn't just "make goop" this week ... Students dove head first into their own inquiry. Here's the story:

This week, one of the girls in my class brought out a ziploc bag full of bright blue goopy, flubbery gunk. First of all, I LOVE the initiative that she took and the confidence that she had to take it out of her school bag. Second of all, I LOVE that she set up her very own centre with this blue goopy gunk, calling all of her friends over to the table and indicating that the centre had too many friends when there wasn't enough goop to go around. 


Naturally, the students suggested that we make more. We researched the ingredients (which I had on had because I had been waiting for a rainy day to make this stuff), took a walk down to the breakfast kitchen to get the materials and supplies and got to work! 


From start to finish, students were incredibly engaged. Science lends itself quite naturally to the FDK program and this experiment was no exception. We have since made two batches and the learning has been endless. Kids LOVE goop! There's something about that sticky, gooey, malleable, slimy stuff that 5 year olds love. I know I'm totally dating myself, but if you're wondering what it reminds me of, its Robin Williams Flubber. Haha. 


Here's the recipe and instructions (so simple!):

1 1/2 cups warm water
2 cups elmer white glue
food coloring
1 1/3 cups warm water
3 teaspoons borax

1. In one container mix 1 1/2 cups warm water, white glue and a few drops of food colouring.
2. In a second container mix 1 1/3 cups of warm water and Borax.
3. Mix the Borax mixture into the glue mixture until combined (may be some liquid in bottom of container).
4. Place Fubber on a tray and let stand for a few minutes before playing with it!
5. Store in air tight container.

Here's the link: <a href="http://www.food.com/recipe/flubber-134095?oc=linkback">http://www.food.com/recipe/flubber-134095?oc=linkback</a>

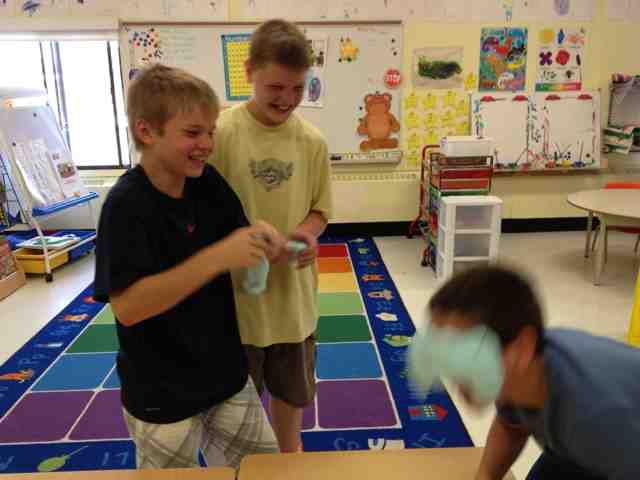
I have a couple of Grade 5/6 boys who come to help me at recess (i.e. stack chairs, clean the tables, sweep the floor, empty the water table, etc) and even THEY got a kick out of the goop. Usually when they finish their jobs, I let them play floor hockey in my room ... They are hockey crazy. This week they gave up the hockey sticks to play with the flubber instead. 


And to think ... If the goop had stayed in the little girls bag, none of this would have happened.
Pin It

Thursday, 16 May 2013

Dramatic play ... En francais

As children take part in dramatic play, they come together to learn SO MUCH! This isn't new or ground-breaking by any means, but here are some ways in which dramatic play can enhance a child's learning ... 

1. They refine social and emotional norms (think: turn taking)
2. They increase their gross and fine motor skills (think: dressing a baby)
3. They develop literacy skills (think: writing down phone messages in the doctor's office or making a grocery list)
4. They learn to ask and answer questions, thus increasing their vocabulary, communication and language (think: role-playing house). 

As a French kindergarten teacher in a French immersion kindergarten class, I often wondered if the students would ever extend their French language acquisition into their play. I'm here to tell you that THEY DOOOOOOOO!! And,  it's WONDERFUL!!

Students played 'mini-prof' today and since they were playing ME, they were speaking French. They took turns playing 'teacher,' choosing the chef du jour, asking students to assis or debut, telling each other where they could "travaillent ou jouent" ... It truly was amazing. 


Pin It

Thursday, 2 May 2013

Listening. Really listening.

When I think of assessment, I think how students can show me what they've learned. But what I really need to think about is how students can show me what they've learned or what they know. Taking what the students say and bringing it back to the curriculum to assess whether or not "they've got it" ... Taking conversations that have been had and relating it to a ministry document and deciding whether or not they have accurately represented learned information. In a play-based environment, this is the ONLY way to assess students learning without feeling like you're a chicken with your head cut off.

By taking a few minutes every day (even if its only 5 or 10) and investing "quality" time with students (even if its only a few students every day), I feel that I can get a better sense of "where they are and what they know" ...

After all, isn't that what FDK is all about? Learning though play ... Why stop a student from building a masterpiece and ask them to count for you when you can join them at the block centre and count how high their tower is?

:)

TTFN, Pin It

Wednesday, 10 April 2013

Learning Stories!

Learning stories are the new "wave " of assessment in FDK. In an article on the subject, Susan Hill writes:

Learning stories capture the context of the learning environment that appears to be enabling or constraining learning. Learning stories are not the same as case studies or running records about children—they are narratives or stories and they need to be a good tale.

My personal goal is to have at least one learning story completed for each student by the time the year is finished. But .. I'm having so much fun writing them that I think I may get more than just one per student. These are posted on my Instagram account (mskiddskindergarten) and I've also created a feed (using a third party website which was free) to this blog so that you don't have to actually have an Instagram account to view them online. 

As soon as I've figured out how to print to the wireless printer at school, I'll be sending home these lovely love notes. Parents and students alike will love receiving these. Not only do they tell what learning is evident, their accomplishments and progression, but they also tell what is happening in the picture to guide further instruction (for teachers). 

Here are a few examples of learning stories that I have created using Instagram:


Pin It

Monday, 8 April 2013

Making seed nests

During one of our guided activities today, several materials were laid out on the circle table waiting for the students: paper towels, cookie sheets, ziploc baggies, markers and a package of seeds.

Interest was soon sparked. "What are we doing here?" they asked ...

I sat with them and told them that we would start with the baggie. Students were given a plastic baggie and asked to write their name on it with permanent markers. Although it sounds like a simple concept ... only having 2 markers and 4 students and asking EVERYONE to write their name created some immediate discussion. Discussion such as, "You go first, then I'll go next," and "I want the rouge pas the bleu," and "Here, let me help you write your name."

They quickly made predictions about what we would be doing with the baggies, the paper towel and the seeds. One little guy even said, "the paper towel is to clean up the mess when we're done!" Too cute. Finally, after much discussion, they came to the conclusion that we would be planting the seeds. Of course, "Duh! Ms. Kidd! That's what you do with flower seeds!" To find out just how much they know, I asked them (straight up), "What three things do plants need in order to grow?" Sure enough, they answered with soil, water and sun. So, low and behold, without teaching this small group about plants (keep in mind that we have NOT been doing ANY sort of unit/theme on plants thus far), they already know so much! I later explained that we would be using the paper towel instead of soil so that we could watch it grow in the window before transplanting them. They made connections and said that the paper towel would be the nest, or the home for the seeds before we put them in the soil. Amazing.

 
This little guy waited very patiently for his paper towel to be completely immersed in the water tray. When asked how he knew that it wasn't all wet, he said, "It's a different colour over here." Then, when I asked him if he could do anything to make it go faster, he pushed his fingers onto the dry areas.

Students carefully selected 3 seeds from the bag to germinate in their paper towels. When I asked them why they thought I was stapling the baggies (I put some staples at the top, and some at the bottom of the bag), some answered that the seeds can't drown. Others said the obvious (or not so obvious to some), to keep them from falling out of the bag if they fall


Et voila! Our germinating seeds in their nests. When asked where they thought we should put the seeds to grow, some said in the hallway where it's light, some said on my desk because it's safe and others said by the sun. You'll notice a few without a 'nest' ... there were a few students convinced that you don't need a nest. Hmmm.
 
If you don't see another post about germinating seeds, it's because this activity failed to 'plant a seed of inquiry' ... haha. 
Pin It

Sunday, 7 April 2013

Instagram!

A picture is worth a thousand words ... So in an effort to share all the pictures that I take for documentation purposes (and some just because they're cute), I've decided that Ms. Kidd's Kindergarten needs to be on Instagram!

I don't have too much going on right now but it'll be a great way to post pictures throughout the day of all the happenings in Kindergarten yellow.


Come "follow" us! 

TTFN,

Pin It